Resource Documents
A Resource Document![]() A Resource Document is a file, such as an equipment manual or floor plan, that you upload to a FormSpace in the TrueContext Web Portal. You can reference PDF Resource Documents in a form or make documents available to field technicians in the Resource Library, where Word and Excel files display as PDFs. is a document file, like an equipment manual, that you upload to a specific FormSpace
A Resource Document is a file, such as an equipment manual or floor plan, that you upload to a FormSpace in the TrueContext Web Portal. You can reference PDF Resource Documents in a form or make documents available to field technicians in the Resource Library, where Word and Excel files display as PDFs. is a document file, like an equipment manual, that you upload to a specific FormSpace![]() FormSpaces are where forms are stored and organized in the TrueContext Web Portal. A TrueContext Team may have multiple FormSpaces, depending on their needs. Admins can set FormSpace permissions to control which users have access to the forms in that FormSpace. in the Web Portal. You can reference a Resource Document in any form in that FormSpace
FormSpaces are where forms are stored and organized in the TrueContext Web Portal. A TrueContext Team may have multiple FormSpaces, depending on their needs. Admins can set FormSpace permissions to control which users have access to the forms in that FormSpace. in the Web Portal. You can reference a Resource Document in any form in that FormSpace![]() FormSpaces are where forms are stored and organized in the TrueContext Web Portal. A TrueContext Team may have multiple FormSpaces, depending on their needs. Admins can set FormSpace permissions to control which users have access to the forms in that FormSpace. that has a Document Editor question. When you update a Resource Document, any forms that reference the document update when a field technician reconciles their device.
FormSpaces are where forms are stored and organized in the TrueContext Web Portal. A TrueContext Team may have multiple FormSpaces, depending on their needs. Admins can set FormSpace permissions to control which users have access to the forms in that FormSpace. that has a Document Editor question. When you update a Resource Document, any forms that reference the document update when a field technician reconciles their device.
You can also add a Resource Document to the Resource Library for field technicians to access anytime.
This topic describes when and why you’d use Resource Documents![]() A Resource Document is a file, such as an equipment manual or floor plan, that you upload to a FormSpace in the TrueContext Web Portal. You can reference PDF Resource Documents in a form or make documents available to field technicians in the Resource Library, where Word and Excel files display as PDFs. in forms and in the Resource Library
A Resource Document is a file, such as an equipment manual or floor plan, that you upload to a FormSpace in the TrueContext Web Portal. You can reference PDF Resource Documents in a form or make documents available to field technicians in the Resource Library, where Word and Excel files display as PDFs. in forms and in the Resource Library![]() The Resource Library enables you to build a digital, multilingual, and searchable knowledge base that contains your organization’s essential content. Available to your mobile users in the Mobile App, the Resource Library simplifies the distribution, discovery, and use of critical information—such as manuals and schematics—to support your field technicians in their work. The Resource Library serves as a mobile reference library for your field teams.. It also describes how to create, edit, and delete a Resource Document in the Web Portal.
The Resource Library enables you to build a digital, multilingual, and searchable knowledge base that contains your organization’s essential content. Available to your mobile users in the Mobile App, the Resource Library simplifies the distribution, discovery, and use of critical information—such as manuals and schematics—to support your field technicians in their work. The Resource Library serves as a mobile reference library for your field teams.. It also describes how to create, edit, and delete a Resource Document in the Web Portal.
Available on the Intelligent and Elite tiers:
Contents
Resource Documents in forms
To use Resource Documents in forms, you set up Document Editor questions that allow field technicians to annotate PDF documents.

You can choose any Resource Document that’s in the same FormSpace, and different forms can use a single Resource Document.
Resource Documents in the Resource Library
The Resource Library enables you to build a digital, multilingual, and searchable knowledge base that contains your organization’s essential content. Available to your mobile users in the TrueContext Mobile App, the Resource Library simplifies the distribution, discovery, and use of critical information—such as manuals and schematics—to support your field technicians in their work.
When you create a Resource Document, you can make the resource visible in the Resource Library. The Resource Library is a tab on the Mobile App home screen. This makes it possible for field technicians to open a
A field technician must have Can Submit or Can Test permissions in the FormSpace to open and use the Resource Library. If a technician has these permissions in multiple FormSpaces, the Resource Library on their device can display resources![]() Resources are materials that field technicians can access while they work on records in the Mobile App. A resource might be a Resource Document, like a manual or a floor plan, or a Resource Image, like a schematic or a diagram. Resources are uploaded to a FormSpace and can be referenced in forms or made available in the Resource Library. from different FormSpaces.
Resources are materials that field technicians can access while they work on records in the Mobile App. A resource might be a Resource Document, like a manual or a floor plan, or a Resource Image, like a schematic or a diagram. Resources are uploaded to a FormSpace and can be referenced in forms or made available in the Resource Library. from different FormSpaces.

Info:Our documentation on the Resource Library describes this feature in more detail.
Resource Document file types and sizes
The following table describes file types you can add as Resource Documents and where you can use them.
| File type | Can be used in forms? | Can be used in the Resource Library? | Max size |
|---|---|---|---|
| Yes | Yes* | 5 MB | |
| Word | No | ||
| Excel |
*In the Resource Library, all documents open in a PDF viewer.
When to use a Resource Document
Use a Resource Document as part of a Document Editor question to provide field users with a PDF file to annotate.
Because a Resource Document is a shared resource within the FormSpace, it's easy to keep all your forms up to date with the latest version. Simply edit your Resource Document to make any changes, such as uploading a new PDF file. The document updates after a reconcile—there's no need to manually update any of your forms.
Create a Resource Document
-
Go to Forms & Integrations > Resources.
-
Select Create Resource, and then select Resource Document.
-
Select Choose File, and then select a document from your local files or cloud service.
Tip: The following table describes file types you can add as Resource Documents and where you can use them.File type Can be used in forms? Can be used in the Resource Library? Max size PDF Yes Yes* 5 MB Word No Excel *In the Resource Library, all documents open in a PDF viewer.
Result: Sections display to enter resource details, add tags, and set up additional language resources.
-
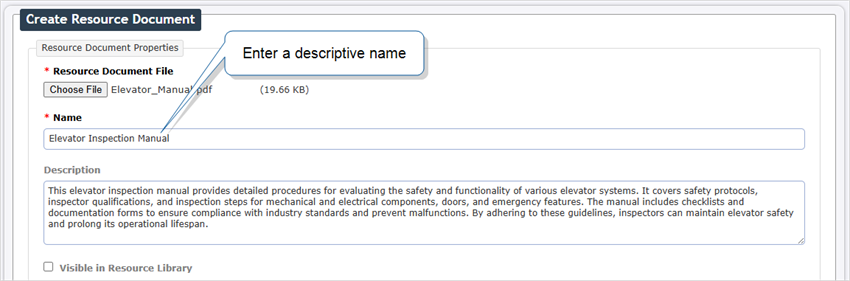
Enter a name and description. A description explains how a field technician should use the resource. It also improves search results in the Resource Library on the Mobile App.
-
Do you want to make the Resource Document available in the Resource Library?
-
If yes, select Visible in Resource Library.
Result: Once you save the resource, a field technician can access the resource in the Resource Library as soon as they reconcile their device.
Note:An Admin user must enable the Resource Library tab so that field technicians can see the Resource Library on their devices.
-
If no, go to step 6.
-
-
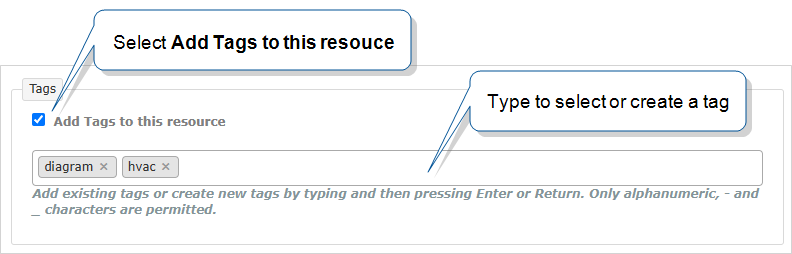
(Optional) Add resource tags. You can use tags to filter the resources list. Tags also help field technicians filter the Resource Library to find what they need. To add a resource tag, select Add Tags to this resource, and then type to select or create a tag.
Info:The section
-
(Optional) Link translated resources.

Info:The section Resource Documents: Set up multiple languages describes this process in more detail.
-
Select Create or Update.
Result: The Resource Document is available for Form Designers to reference in forms.
-
Do you want to create another Resource Document?
-
If yes, select Create Resource Document. This will be a new resource, not a linked resource.

-
If no, you have completed the procedure.
-
Apply resource tags
Resource tags in the Web Portal
Tags help you filter the list of resources by relevant criteria. Select one or more tags from the Filter section on the Resources page to find resources that have those tags.

Resource tags in the Resource Library
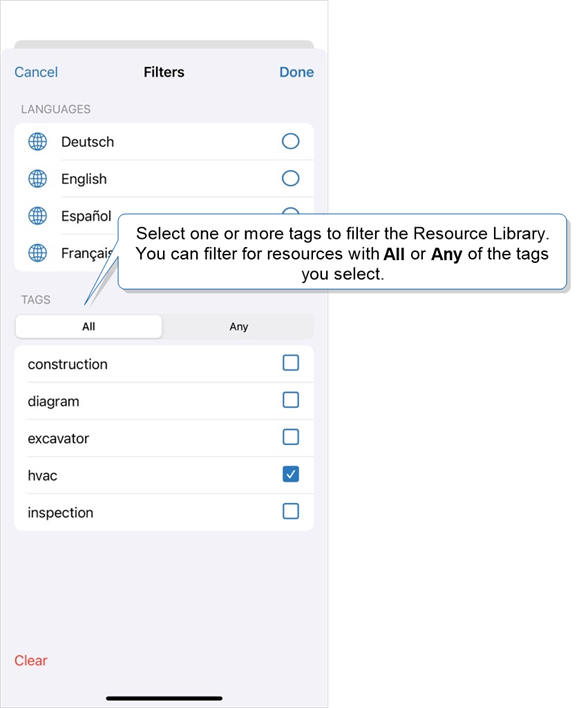
Tags also help organize resources in the Resource Library. A field technician can use tags to filter the Resource Library on their device and quickly find relevant documents and images.
Tagging guidelines
You might tag a
-
Equipment types, like motors or air conditioning units.
-
Equipment brands or makes.
-
Resource types, like schematics or manuals.
Info:Tags applied to a
Steps to apply resource tags
To apply tags to a
-
Select Add Tags to this resource.
Result: The Tags section expands to display a field to enter tags.
-
Enter a tag. As you type, existing tags display as suggestions. Select an existing tag, or press Enter or Return to create a new tag. Repeat this process for each tag you want to add.
Note:Resource tags are different from form tags. The topic Set Up Form Properties: Form Information describes how to add tags to a form.
Set up multiple languages
Translated resources in forms
If your company has the Multi-Language feature, you can link translated files to a
You link
Translated resources in the Resource Library
Steps to set up translated resources
Once your translated resources are set up, you can delete the primary resource and select a new primary. The
-
Select Set up multiple languages.
Result: The Additional Language Resources section expands to display the Language menu and Linked Resources table.
-
Select the language of the primary

-
Add or link to at least one translated resource.
-
To add a new resource, select Add New Resource. Enter a Name and Description, and then select Choose File. Select a file, select a Language, and then select Add.

-
To select an existing resource, select Link Existing Resource. Select one or more resources to link to the new resource, select a language for each translated resource, and then select Link.
Note:You can only link resources that are not already linked to other resources.

Result: The primary resource is linked to versions in different languages.
Note:A translated resource can be in a different format than its primary. For example, if the primary resource is a PDF, you can link Word and Excel documents. However, you cannot use Word or Excel documents in Document Editor questions in forms. If a primary resource links to one of these file types, you cannot use the primary resource in a form.
-
-
Select Create or Update.
Bulk Create Resources
Rather than adding ![]() A Resource Image is an image file, such as an equipment schematic or diagram, that helps field technicians complete their work. Form designers upload Resource Images (JPG, JPEG, or PNG) to a FormSpace and can reference them in forms or make them available in the Resource Library. When a Resource Image is updated, forms automatically use the latest version after the device reconciles. and Resource Documents.
A Resource Image is an image file, such as an equipment schematic or diagram, that helps field technicians complete their work. Form designers upload Resource Images (JPG, JPEG, or PNG) to a FormSpace and can reference them in forms or make them available in the Resource Library. When a Resource Image is updated, forms automatically use the latest version after the device reconciles. and Resource Documents.
Tip:When you bulk create resources, the system adds each resource individually. You can’t bulk create a group of translated resources that are already linked. However, you can bulk create the same resource in multiple languages, and then link the files after. The section Set up multiple languages describes how to link existing resources in more detail.
-
Go to Forms & Integrations > Resources > Bulk Create Resources.
-
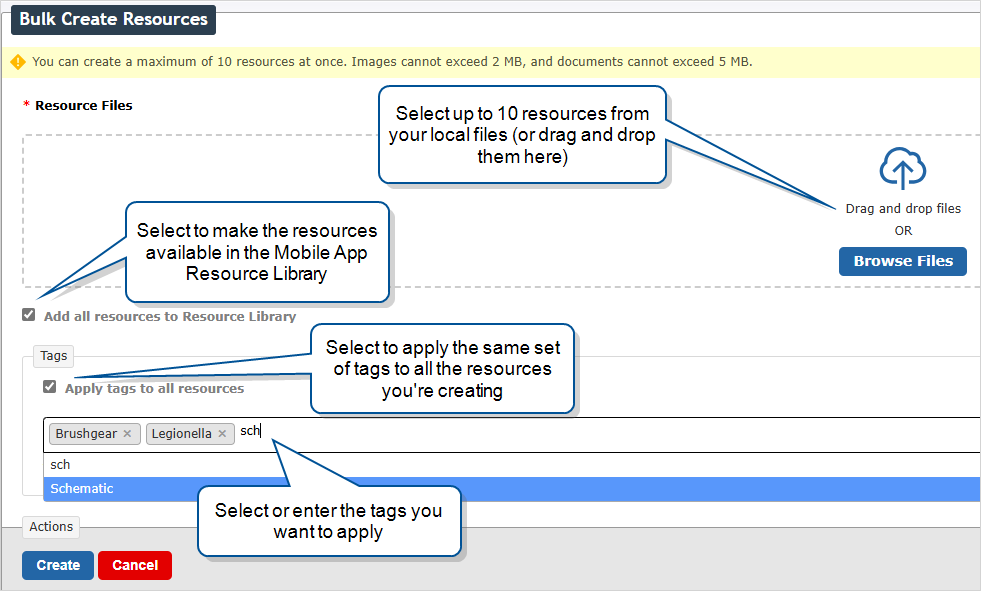
In the Resource Files area, select Browse Files or drag and drop up to 10 files.
-
Do you want to make all of the files available in the Mobile App Resource Library?
- If yes, select Add all resources to Resource Library.
- If no, the files will only be visible in the Web Portal. Go to the next step.
-
Do you want to apply tags to all of the selected files?
- If yes, select Apply tags to all resources. Select or create the tags you want to apply.
- If no, go to the next step.
-
Select Create to bulk upload the files.
Result: A summary of the newly created resources displays. Select a resource to preview or edit it. If any files fail to upload, a second table lists the errors.
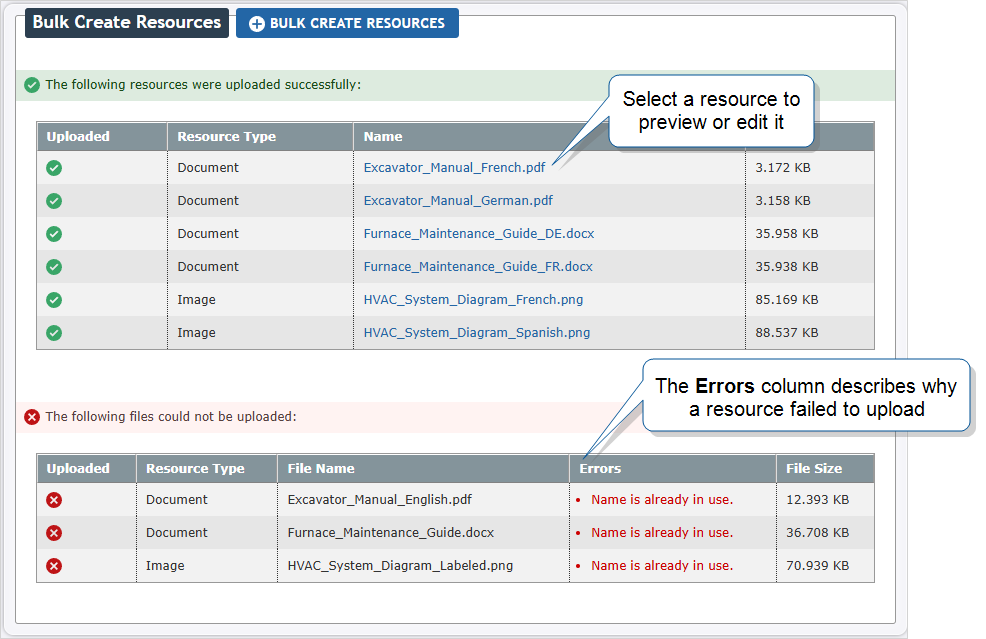 Note:A file will fail to upload if:
- The file is too big. Resource Documents have a maximum file size of 5 MB. Resource Images have a maximum file size of 2 MB.
- The file type is not supported. A Resource Document must be a PDF, Word, or Excel file. A Resource Image
 A Resource Image is an image file, such as an equipment schematic or diagram, that helps field technicians complete their work. Form designers upload Resource Images (JPG, JPEG, or PNG) to a FormSpace and can reference them in forms or make them available in the Resource Library. When a Resource Image is updated, forms automatically use the latest version after the device reconciles. must be in JPEG, JPG, or PNG format.
 - The file name is already in use.
-
Do you want to bulk create more resources?
-
If yes, select Bulk Create Resources, and then go to step 2.
-
If no, you have completed the procedure.
-
Filter Resource Documents
By default, the resources table lists resources alphabetically. Use the Search bar to search for matching text in resource names.
You can also filter the list of resources according to a number of criteria to quickly find what you need.

You can filter the list by:
-
Type—
-
Language—select a language, or select Unspecified to find
-
In Use—find
-
Group—find
-
Tags—select one or more tags to find
-
Visible in Device Resource Library—find
Select filters as necessary, and then select Apply.
Tip:Filtering matches all criteria. The more filters you apply, the fewer results you will receive. You can also combine filters with search terms to narrow the list further.
Edit a Resource Document
Edit a
If the
You can add Excel and Word documents to the Resource Library, but you can’t use them in a form.
You can edit a
-
Go to Forms & Integrations > Resources. Hover over a

-
Go to Forms & Integrations > Resources. Select a

Tip:After you save, all forms that reference the Resource Document automatically update with the new file when a user reconciles their device.
Delete a Resource Document
You can't delete a resource if any form versions use it, whether they’re Active, Archived, or Draft forms. Open a resource and check the Referencing Forms section to find a list of forms that use the resource.
-
Go to Forms & Integrations > Resources.
-
Select a
-
Hover over a
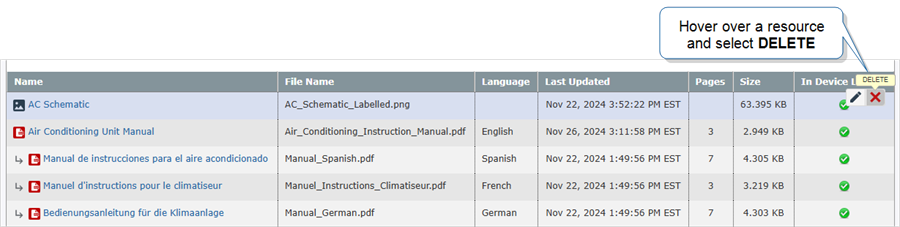
-
Select a
-
-
Is the
-
If yes, and you want to delete the resource and all linked resources:
-
Select Delete this resource and all linked resources, and then select Proceed.
-
-
If yes, and you want to select a new primary:
-
Select Delete this resource and select an alternative....
-
Select a new primary.
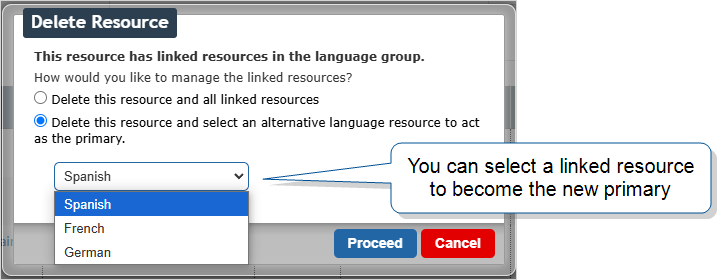
-
Select Proceed.
-
-
If no, select Permanently Delete Resource Document.
-